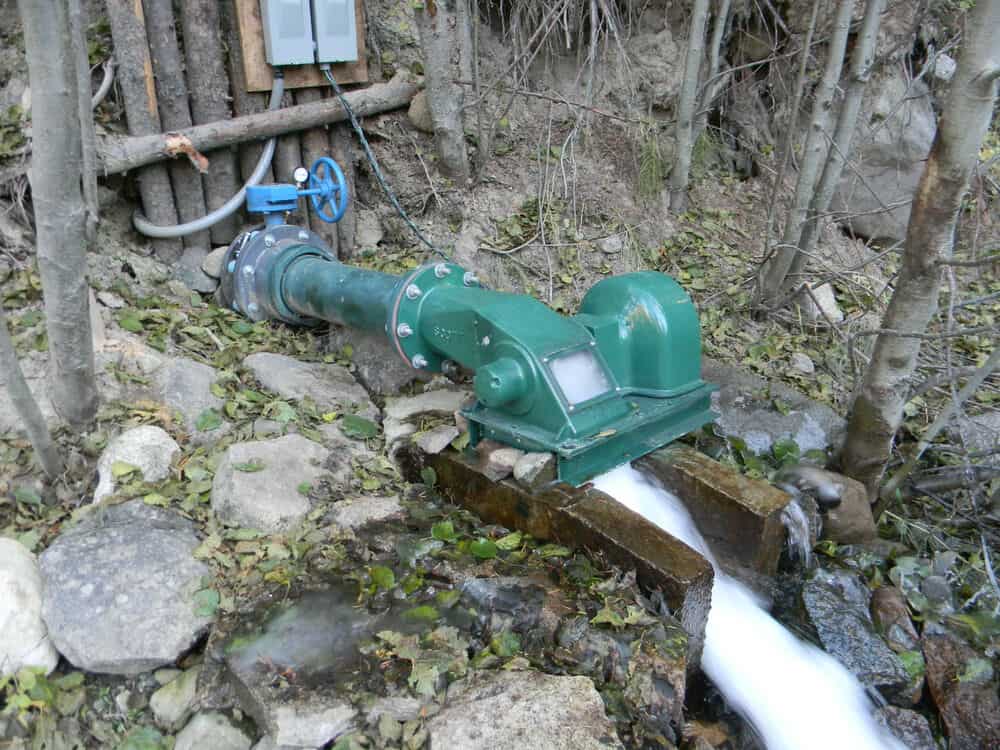
If you have a stream flowing nearby or on your farm, you most probably have thought of hydroelectric power. Many people do not know what it entails to produce power from flowing water. In this article, I will explain how to produce hydroelectric power, and more so how to build a micro-hydroelectric power generator.
Micro hydroelectric power generator
Also known as a low-impact or run-of-stream hydroelectric generator, Micro hydroelectric generator is a small-scale power generation unit that can be set up at home to produce electricity from flowing water via a turbine. It does not require a dam or a vast source of water. You can also make it easily at home as all the materials are either readily available or can be bought from nearby stores. The tools are also not specialized and the required skills need not be advanced.
How to make a micro-hydroelectric power generator
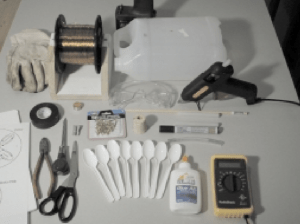
The following are the tools that you will need:
- A pair of scissors
- Electrical/insulating tape
- Electric drill and 0.25’’ drill bit
- Ruler
- White glue
- Hot glue gun, and 3 glue sticks
- 3.5’’nail
- Knife
- Pencil sharpener
- Permanent felt tip marker
- Safety gloves and glasses
- Pliers or wire cutters
- Magnetic compass
You will also need the following materials:
- Brass paper fasteners- 4
- Clear vinyl tubing – length; 6cm, 0.25’’ inside diameter
- Ceramic magnets – 18mm
- 2.25’’ Wooden dowel – length 20cm,
- Heavy-duty corrugated cardboard- 22cm X 30cm
- Coated magnet wire – gauge 24, 100m
- Cork – 5cm
- Plastic spoons – 10
- Plastic jug, preferably 4-liter capacity
Method
Some several parts and sub-assemblies constitute this DIY micro-hydroelectric power generator.
These are discussed below, step by step.
How to prepare the disks
- Apply a thin layer of white glue at the back of the template sheet and join it to the cardboard. The glue layer should be thin and covering the entire template.
- Wait for the glue to dry up sufficiently and by using the knife, cut the outline of the rotor and the stator disks on the cardboard. You should do this while placing the cardboard on a scrap wooden flank, or if you’re careful enough, you could do it on the table. You should also shear the edges meticulously.
- Establish the exact center of the rotor disks by drawing two diameters so that their point of intersection is the center. At this center, drill a small hole using a sharp nail. Make a larger hole at the center of the stator disk, of about 1cm diameter. This is best done using the knife.
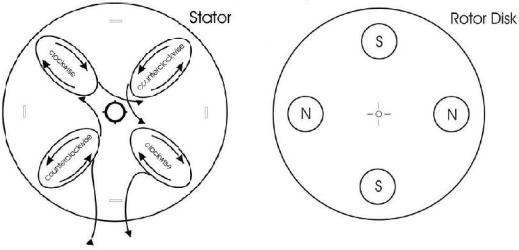
How to prepare the stator
- Make a jig frame on which to wind your coils. Do this by cutting a segment of cardboard measuring 3 cm by 16 cm. fold this piece of cardboard in half and fasten a small piece of insulating tape around it to keep it in that shape.
- Make 8 pieces of electrical tape, each measuring 4 cm and place them aside
- Measure a section of the wire for the coil, and from the mark, start winding it on the jig to make a tight coil of exactly 200 loops or turns
- Carefully, take the coil out of the jig without disturbing it and fasten two of the 8 tape pieces (step 2 above) around it.
- Using a piece of sandpaper or abrasive material, scour the ends of the exposed ends of the coil wires to make 1cm of bare wire at both ends.
- You need a total of four coils to make this generator so repeat the steps to make three more coils.
- Place the template on the table and place the coils on it as shown on the outline. Make sure the coils are arranged in such a way that the windings intersperse between clockwise and anticlockwise. This is indicated on the template. The left-hand side is your reference, so connect the coils so that the current flow would be as shown on the template.
- After you have correctly connected the coils, insulate the connection points using insulating tape.
- Check your connections using an electrical multi-meter on the resistance mode. Electrical wires usually have a small resistance, but an air gap would produce infinite resistance. Connecting the two probes of the multimeter to the two free ends of the coils should produce a resistance of around 10Ω and not more.
- After confirming that the electrical coils are well connected, it’s time to attach them to the stator disk. Do this by applying a huge lump of glue at the point where the coil makes contact with the template. Do this for every coil, allowing the glue to dry up for each coil before proceeding to the next one.
- Make four cuts on the cardboard as indicated on the template using a knife. It is through these slits that the stator will be adjoined to the plastic jug.
How to prepare the rotor
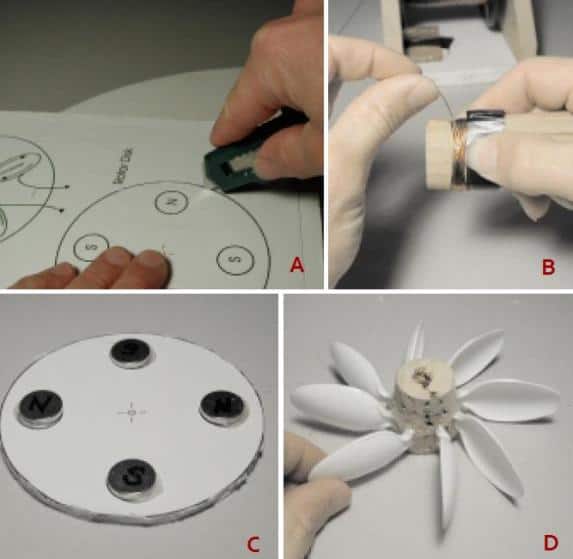
- Have for magnets with you and use the magnetic compass to establish the polarities on either of their faces and mark them using the felt tip marker.
- Ready the hot glue gun by warming it to fix the magnets onto the rotor disk. The order of attaching the magnets should be such that their polarities alternate as shown on the template. The order should be like S-N-S-N
- Dispense a small lump of hot glue at the spot where you want to place the first magnet; place the magnet on it and apply medium pressure on it. Allow it to dry and repeat this for the other three magnets as you alternate the polarities.
How to make the rotor shaft
- Make a 20cm long piece of the wooden dowel
- Make two points on both ends of the dowel using a pencil.
How to make the turbine
- On the larger piece of cork, drill a 0.25’’ hole through its center.
- Establish the center of the larger-diameter side of the cork on the marking guide (as seen on the template page). Mark out the cork using a pencil.
- Place the cork on a piece of wood or cutting board by its wider sider side and carefully make small slits into it. These are the points where the spoons will be attached.
- Take the eight spoons and use a wire cutter or the knife to cut off the handles such that you will leave a handle measuring about 1cm from the bowl side.
- Warm up the glue gun
- By carefully following the template guide, insert one spoon on the cork by the stem, to a depth of about 1cm.
- Repeat step 6 above for the other seven spoons, ensuring that they protrude from the cork at the same angle.
- Apply glue from the hot gun onto the point where each spoon enters the cork, to have them in place.
How to prepare the housing
- Take the plastic container and cut off the bottom part.
- Accurately establish the center of one of the sides of the container and mark it with a permanent marker. Do the same for the opposite side.
- Make holes on both marks on the plastic container, measuring 0.25’’ in diameter.
- Place this container in such a way that one of the sides bearing the holes is on the table while the opposite one is facing up. Place the stator assembly on the side facing up and align its center hole with the hole in the container. Drive a nail through each of the slots on the rotor to make some marks on the plastic container.
- On the marks made on the plastic container, make slits that coincide with the slits on the stator board.
- Securely affix the stator disk onto the plastic container using the brass to crease-over tabs on the inside of the plastic container.
Assembling the generator
- Make two pieces of the vinyl tubing using the pair of scissors. These pieces should be 1 cm long.
- Drive the wooden shaft through the hole at the center of the stator disk, into the plastic container. Then glide one vinyl tubing on the shaft.
- Place the turbine you made out of the cork and plastic spoons into the container in such a way that the spoons face the neck of the bottle.
- Push the wooden shaft through the cork so that it comes out the other side of the plastic container and protrudes by at least 4 cm.
- Since the neck of the container will be the water inlet, adjust the position of the turbine in the container so that it is aligned with the neck.
- Push the vinyl tubing along the shaft so that it is close to the inside of the container but not in contact with it.
- Push the other piece of vinyl tubing on the other side of the shaft in the same manner. These vinyl tubings are to secure the shaft so that it does not rock back and forth misaligning it with the neck of the container.
- Turn the turbine by hand to ensure it doesn’t collide or rub against the inside of the container.
- Push the rotor assembly into the shaft to the side of the stator and adjust it so that it is about 0.125’’ from the stator coils. Test if the magnets are at a good clearance from the stator by rotating the shaft.
- Turn the shaft slowly and adjust the rotor accordingly so that it spins without wiggling. Apply hot glue to secure it in that position. Then apply some more at the point where the shaft meets the strengthening disks.
It’s now time to test your assembly.
- Proceed to a water tap and place the neck of the housing (plastic container) in a way like you’re fetching water.
- Turn on the water. The water should turn the turbine and if all the connections are good, a potential difference (electrical voltage) should be generated. To test this voltage difference, attach the coil ends to the test probes of the multimeter and set it to test alternating current. Your micro-hydroelectric generator is up and running!
- This model can be scaled up for higher capacity, efficiency, and convenience. A bigger model would include bigger and robust housing, bearings on the shaft, and machined stronger shaft among others.
Precautions
When working on this project, you should be watchful as some of the operations and materials used can pose some considerable danger. Below are some safety precautions you should take.
Read next: All you need to know about wind energy
- Wear eye protection when using the hand drill. Drilling action results in swarfs flying, especially if the equipment is operated at high speeds.
- Leather gloves are also recommended when using a hand drill, nails, and knives, to protect your hands from injury
- Warm up the hot glue gun only when in need to avoid burns in case of mishandling.
- Wear a dust coat or a coverall to avoid spilling glue on your clothing.
- If you’re using a utility knife, withdraw the blade when not in use, to avoid the risk of cuts and bruises.
Frequently asked questions
Can this generator power a small household?
This prototype represents an idea that can be implemented to a greater scale. Depending on the size of the household, and the amount of waters and pressure, you can make a generator that produces more power.
Can the power be used directly from the generator?
No. most household electrical appliances use power at standard parameters (voltage and current). This generator does not produce power at those parameters, thus you will certainly need a power inverter.
Does the generator pose any risk?
This is a simple prototype that doesn’t output much power. The risk involved is minimal but on a larger scale, the generator would need careful assembly and selection of materials such as cables and magnets.
A good read for you: Adopting An Eco-Friendly Lifestyle: Benefits of Residential Geo Thermal Pump
Would this setup land me in trouble with the local authorities?
Different countries impose different regulations regarding power generation, especially hydroelectric power, or others that may pose risk to the individual or the community. Be sure to check with the authorities to avoid landing in trouble.